This is a reference to assist you in walking through plugging Message Sniffer into an a PERL ASSP Install.
It is recommended that you have ASSP configured to handle mail to your satisfaction prior to adding the Message Sniffer ASSP plugin. Setting up ASSP is a task in itself.
How Do I Get Started?
- Sign up for a 30-day FREE Trial. This will give you an authentication and license ID to download a production ready rulebase and updates FREE for 30 days. You will need the license and authentication in order to setup your SNF software. Our system will send you rulebase download instructions when your rulebase is ready, but the Installer will handle setting that up for you.
- If you are using ASSP in a *Nix application. Follow the installation procedure in the *nix tutorial. Then skip to step 8.
- If you are using a Win* install of ASSP, you will need to download the
SNF Client/Server Win* SNF
Client/Server Win* Installer (from Products index page).
The Installer currently does not handle the ASSP install expressly, but it will help you set up a default Message Sniffer install. - Review the Installer tutorial, and read the page for the custom default installation. Have your trial SNF license ready.
- Run the Installer.
- When you have completed the Installer you will have installed Message Sniffer in a folder of your choice, pulled down a rulebase, and setup SNFServer as a service using XYNTService.exe.
- Review the documentation on configuring the snf_engine.xml file for your specific needs (Header Injection, Rulebase Downloads, GBUdb).
- Download and place the ASSP_SNF.pm into the [ASSProot]\plugins folder.
- Download and place the ReadMe file in your SNF or ASP directory.
- Create the following folder in your directory structure:
Windows: "C:\SNFTemp"
The ASSP Plugin will fail if either ASSP or Sniffer looks for the working folder and either can't find or access that folder.
*Nix: "/opt/snf/tempdir" - In your snf_engine.xml file, set the <xheader> to "api". Save and close the file.
- Restart your ASSP Service.
- Review the following sections of this page to familiarize yourself with the ASSP interface.
Details
This plugin requires ASSP 2.0 or higher (as of this writing ASSP 2.0 is still in beta test). ASSP 2.0 and SNF4ASSP require perl 5.8.8. All necessary modules are included in a standard perl 5.8.8 installation.
This plugin communicates with the SNF Server over TCP. It uses a temporary file to pass an email message to the SNF Server. The temporary file must be in a directory that both the SNF Server and the ASSP process can read, write, and create files in. On *nix systems this can be accomplished by creating a directory (e.g., /opt/snf/tempdir) and setting its ownership to "snfilter:snfilter" and its permissions to 777:
$ mkdir /opt/snf/tempdir
$ chown snfilter:snfilter /opt/snf/tempdir
$ chmod 777 /opt/snf/tempdir
It is strongly recommended that you create a directory specifically for the above mentioned purpose. The default value for this directory is:
Windows: C:\SNFTEMP
*nix: /opt/snf/tempdir
Your SNF Server should be set to operate in "api" mode (Note: This is not the default mode). This reduces I/O by preventing the SNF Server from re-writing the temporary message files. Set the output mode in your snf_engine.xml file, in the <output mode> property of the <xheaders> container like this:
<xheaders>Back to Top
<output mode='api'/>
Configuration
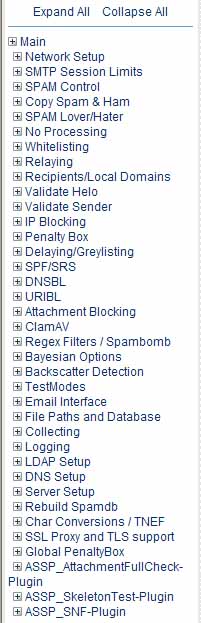
Here is a list of the options you will encounter in ASSP (Figure 1). Somewhere near the bottom of the left column, you will find the ASSP_SNF-Plugin
Figure 1
Remember that before you finish, you must always click Apply Changes at the bottom of the control panel. ASSP will not commit the changes otheriwise (Figure 2).
Figure 2

The ASSP4SNF Plugin provides a configuration pane in the ASSP web-based configuration panel. Click on ASSP4SNF Plugin in the menu and the plugin configuration pane will open. In addition to the standard ASSP Plugin configuration options, the following SNF-specific options/features are configurable in this panel:
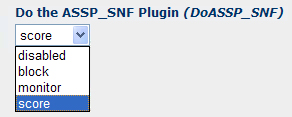
General Feature Response
This feature controls the general feature response. It either turns off, blocks or scores the plugin (Figure 3). The following lists the options and the actions taken if selected:
disabled - do nothing
block - reject the message (if not addressed to spamlover)
monitor - pretend its running (with logging), but don't actually block messages
score - don't block outright, add score value for DoPenaltyMessage & DoPenalty
testmode - don't block, tag messages with spamSubject
Figure 3
Priority Settings
The Priority Setting allows you to set your priority of the ASSP_SNF-Plugin (Figure 4).
Figure 4

Test Mode
This feature will disregard the response of the filter, but always run the filter. This is a good way to confirm that the SNF-Plugin is working before you begin having it affect your mail stream. Combine this will the x-header features in the snf_engine.xml file and you will be able to see what rules and results are being generated (Figure 5).
Figure 5
![]()
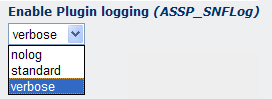
SNF4ASSP Logging
(Figure 6)
Figure 6
PenaltyBox Valence
The PenaltyBox is an accumulative value (similar to how other anti-spam products work per-message), but this works per-IP address or /24 net-block (Figure 7). Once the valence values reach the penalty threshold within the collection interval, those IP addresses or net-blocks will have their connections completely blocked for the expiration time alloted. If the valence values reach the extreme threshold, the IP or net-block will be permanently blocked. For detailed explanation of ASSP's PenaltyBox visit SourceForge's site.
Figure 7
![]()
White-Listing Processing
ASSP operates against IP scores (Figure 8). Each test will contribute or detract from an IP's Score. If the IP is considered whitelisted, then you are going to run the message through this filter.
Figure 8
![]()
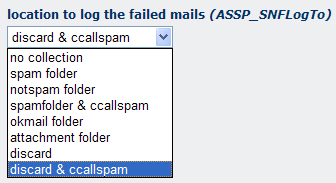
Failed Mail Location Logs
You can select to put failed messages in one of these identified folders or cc to the allspam account (Figure 9).
Figure 9
SNFServer Hostname
The hostname is used to connect to the SNFServer (Figure 10). Usually localhost, but may be different if your SNFServer is running on a different host than this ASSP installation.
Figure 10
![]()
SNFServer Port Number
The port number is used to connect to the SNFServer (Figure 11). The default value is often correct, unless you've intentionally changed it in your SNF configuration.
Figure 11
![]()
Timeout Value
The timeout value is the number of seconds to wait for a connection from the SNFServer (Figure 12). The default should be fine in most cases.
Figure 12
![]()
Temporary Directory
The temporary directory defined is the directory used to pass mail messages to and from the SNFServer (Figure 13). This directory must be writable and readable by both the SNFServer and the ASSP installation.
Figure 13
![]()
Temporary Message Maximum Size
This setting defines the maximum size that will be written for a temporary mail message file (Figure 14). The default (64k) matches the size used by the SNFServer, so there shouldn't be a need to change it.
Figure 14
![]()
Result Code Threshold
The SNF result code threshold that is considered spam. SNF result codes at this level or above will be considered spam for the purposes of ASSP scoring (Figure 15). The default value of 20 is good in most cases.
Figure 15
![]()
Please email support@armresearch.com with any questions.
Back to Top
Technical Summary
Requires Basic Sniffer Install:
|